In this article, we’ll guide you through the setup of a NUT server on a Raspberry Pi and the installation of its client component on a Proxmox server.
By the end of this guide you’d have learnt how to automatically and safely shutdown your Proxmox server once a specific threshold on the UPS is crossed. Let’s dive in!
Step 1:
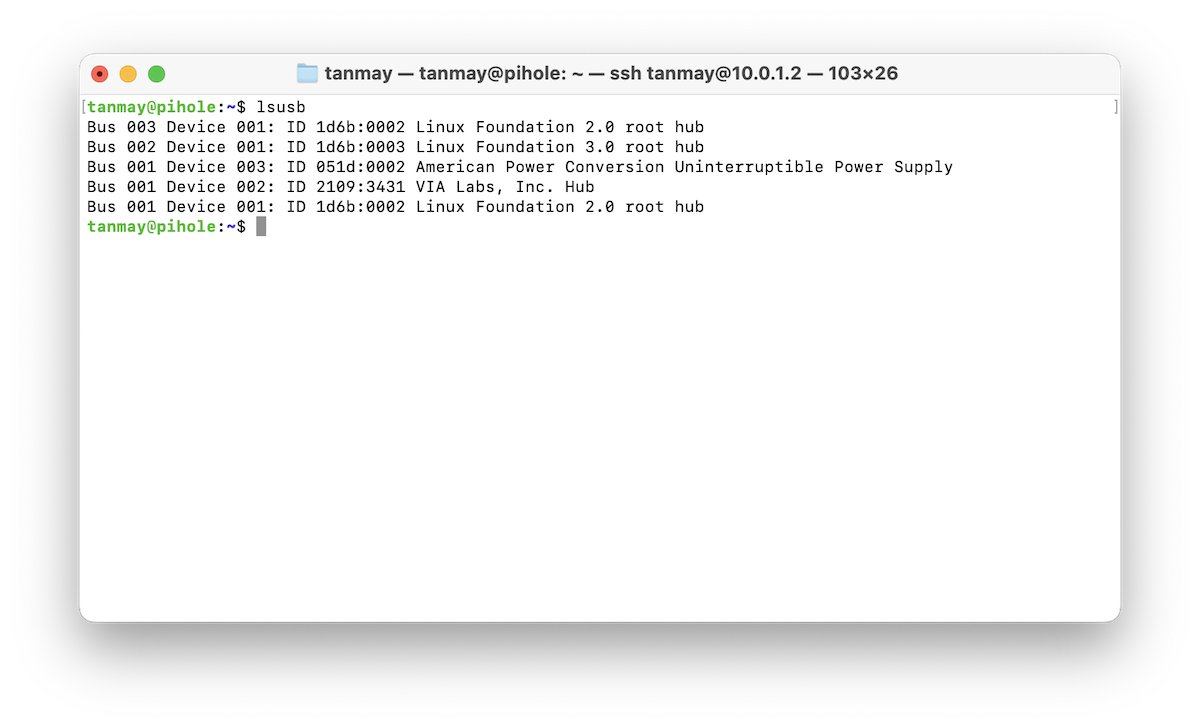
Connect your UPS to the Raspberry Pi via USB and verify you see the UPS connected to your system.
lsusb

Install on Server
Update packages
sudo apt update
Install NUT
sudo apt install nut nut-client nut-server
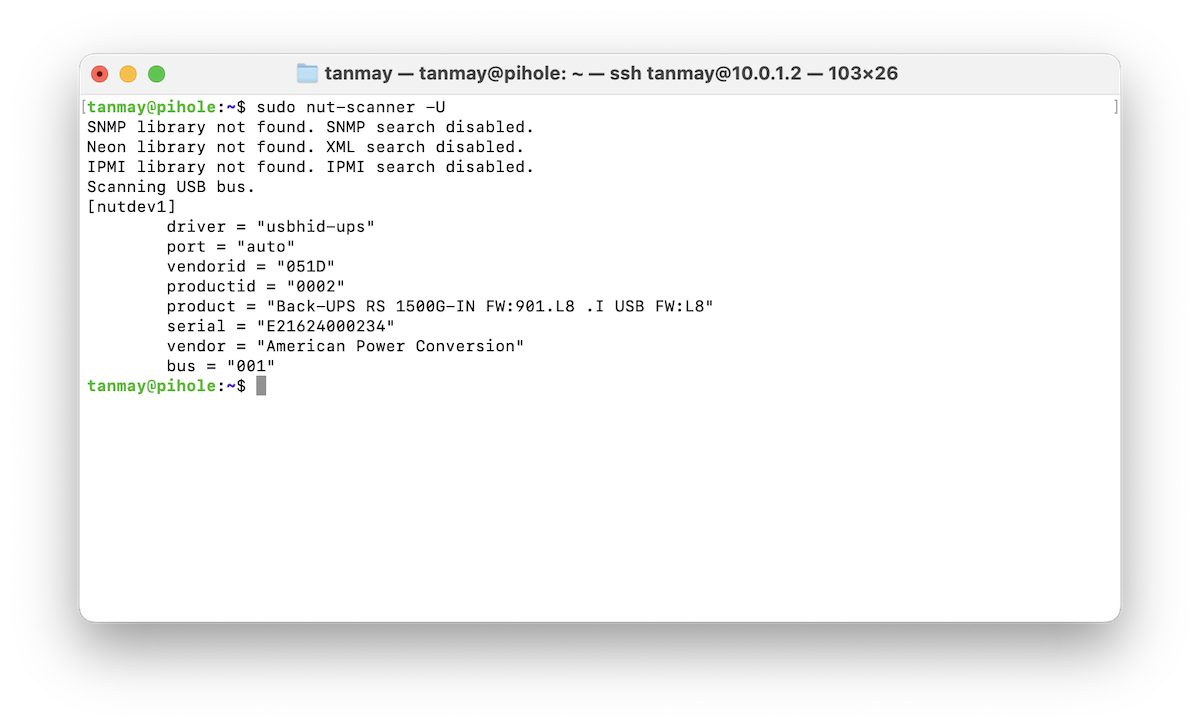
Probe devices to get exact device information
sudo nut-scanner -U

Note down this information for use later.
Configure ups.conf
Edit the config but make a copy of it before editing
sudo cp /etc/nut/ups.conf /etc/nut/ups.example.conf
sudo nano /etc/nut/ups.conf
Here’s how mine looks like
pollinterval = 1
maxretry = 3

[ups]
        driver = usbhid-ups
        port = auto
        vendorid = 051D
        productid = 0002
        desc = "Back-UPS RS 1500G-IN"
        serial = XXXXXXXXX
NOTE: If you want to connect to this NUT server from your Synology NAS, make sure to name the UPS as ups, i.e. the entry name [ups] should stay the same, you should edit the rest of details.
Configure upsd.users
Configures the user account used to access the UPS state
sudo cp /etc/nut/upsd.users /etc/nut/upsd.example.users
sudo nano /etc/nut/upsd.users
Clear out 1 the original file and enter the following details. replace password with the password you like.
[monuser]
  password = secret
  upsmon master
NOTE: If you want to connect to this NUT server from your Synology NAS, make sure to use the exact same user and password details as above.
Configure upsmon.conf
Configures which UPS to monitor
As before make a copy of the original config and edit it
sudo cp /etc/nut/upsmon.conf /etc/nut/upsmon.example.conf
sudo nano /etc/nut/upsmon.conf
Clear out the contents and replace with this:
RUN_AS_USER root
MONITOR ups@localhost 1 monuser secret master
Details:
RUN_AS_USER root: root is required to ensure process has necessary permissions to execute certain privileged tasksMONITOR: Set a monitorups@localhost: name of the ups that you set before before1: Number of power supplies monitored by the UPSmonuser: the username used to authenticate with the UPS. This should match the username configured in the NUT server (typically defined in the upsd.users configuration file).secret: service account passwordmaster: Sets the current system as master node i.e. the one which is physically connected to the UPS
Configure upsd.conf
Configures the monitor to allow listening from all devices.
Make a copy of the original config and edit it.
sudo cp /etc/nut/upsd.conf /etc/nut/upsd.example.conf
sudo nano /etc/nut/upsd.conf
Clear out the files content and replace with this:
LISTEN 0.0.0.0 3493
Configure nut.conf
Make a copy of the original config and edit it.
sudo cp /etc/nut/nut.conf /etc/nut/nut.example.conf
sudo nano /etc/nut/nut.conf
Change the mode to netserver:
MODE=netserver
Install On Client
apt install nut-client
Configure the client.
sudo cp /etc/nut/upsmon.conf /etc/nut/upsmon.example.conf
sudo nano /etc/nut/upsmon.conf
Clear out the contents and replace with this:
RUN_AS_USER root

MONITOR [email protected] 1 monuser secret slave

MINSUPPLIES 1
SHUTDOWNCMD "/sbin/shutdown -h"
NOTIFYCMD /usr/sbin/upssched
POLLFREQ 2
POLLFREQALERT 1
HOSTSYNC 15
DEADTIME 15
POWERDOWNFLAG /etc/killpower

NOTIFYMSG ONLINE    "UPS %s on line power"
NOTIFYMSG ONBATT    "UPS %s on battery"
NOTIFYMSG LOWBATT   "UPS %s battery is low"
NOTIFYMSG FSD       "UPS %s: forced shutdown in progress"
NOTIFYMSG COMMOK    "Communications with UPS %s established"
NOTIFYMSG COMMBAD   "Communications with UPS %s lost"
NOTIFYMSG SHUTDOWN  "Auto logout and shutdown proceeding"
NOTIFYMSG REPLBATT  "UPS %s battery needs to be replaced"
NOTIFYMSG NOCOMM    "UPS %s is unavailable"
NOTIFYMSG NOPARENT  "upsmon parent process died - shutdown impossible"

NOTIFYFLAG ONLINE   SYSLOG+WALL+EXEC
NOTIFYFLAG ONBATT   SYSLOG+WALL+EXEC
NOTIFYFLAG LOWBATT  SYSLOG+WALL
NOTIFYFLAG FSD      SYSLOG+WALL+EXEC
NOTIFYFLAG COMMOK   SYSLOG+WALL+EXEC
NOTIFYFLAG COMMBAD  SYSLOG+WALL+EXEC
NOTIFYFLAG SHUTDOWN SYSLOG+WALL+EXEC
NOTIFYFLAG REPLBATT SYSLOG+WALL
NOTIFYFLAG NOCOMM   SYSLOG+WALL+EXEC
NOTIFYFLAG NOPARENT SYSLOG+WALL

RBWARNTIME 43200

NOCOMMWARNTIME 600

FINALDELAY 5
Make sure to replace the ip.address.of.nut.server part with the IP address of the machine where nut server is installed.
Configure upssched.conf
Configures which function to run in response to certain events occuring.
cp /etc/nut/upssched.conf /etc/nut/upssched.example.conf
nano /etc/nut/upssched.conf
CMDSCRIPT /etc/nut/upssched-cmd
PIPEFN /etc/nut/upssched.pipe
LOCKFN /etc/nut/upssched.lock

AT ONBATT * START-TIMER onbatt 30
AT ONLINE * CANCEL-TIMER onbatt
AT ONLINE * CANCEL-TIMER earlyshutdown
AT ONBATT * START-TIMER earlyshutdown 300
AT LOWBATT * EXECUTE shutdowncritical
AT COMMBAD * START-TIMER commbad 30
AT COMMOK * CANCEL-TIMER commbad
AT NOCOMM * EXECUTE commbad
AT SHUTDOWN * EXECUTE shutdowncritical
Details:
AT ONBATT * START-TIMER earlyshutdown 300: Will execute the earlyshutdown command (configured in next step) if system is on battery for 5 mins.
Configure the command script
nano /etc/nut/upssched-cmd
#!/bin/sh
case $1 in
    onbatt)
        logger -t upssched-cmd "UPS running on battery"
        ;;
    earlyshutdown)
        logger -t upssched-cmd "UPS on battery too long, early shutdown"
        /usr/sbin/upsmon -c fsd
        ;;
    shutdowncritical)
        logger -t upssched-cmd "UPS on battery critical, forced shutdown"
        /usr/sbin/upsmon -c fsd
        ;;
    commbad)
        logger -t upssched-cmd "UPS has been gone too long, can't reach"
        ;;
    online)
        logger -t upssched-cmd "UPS back on line power, canceling shutdown timers"
        ;;
    *)
        logger -t upssched-cmd "Unrecognized command: $1"
        ;;
esac
Restart client
sudo service nut-client restart
To verify your client (proxmox) is able to fetch information about the UPS. Run this command:
upsc [email protected]
-
Tip: To quickly clear contents in nano editor, press Control + Shift + ^ to mark and then scroll your mouse/trackpad to select all content and press Ctrl + k to clear. ↩︎